There are many benefits to working from home. Among those include not having to set an alarm, staying in your pajamas all morning (or afternoon...), getting outside when the weather is warm, and perhaps best of all, cuddling with your kiddos any time you want. Of course, there are some downsides, too. It can be incredibly difficult to balance getting your work done and and making sure your kids are staying out of trouble. I experienced one of those moments this morning.
As I sipped on my morning coffee and checked my email, my three-year-old, Cole, was happily playing upstairs. I could hear him in the bathroom, which I assumed meant he was filling up his squirt gun to spray into the bathtub (a favorite pastime of his). A few minutes later he came bounding downstairs with the most precious, excited smile on his face. "I brushed my teeth all by myself!" he exclaimed. I beamed with pride, gave him a high-five and said, "Way to go, bud! I'm so proud of you!" I really was, too. Cole smiled and added, "And I used a NEW toothpaste!" Hmm... new toothpaste? We didn't have "new" toothpaste in his bathroom. He darted back upstairs to grab this so-called new toothpaste to show me.
A minute later he came back into my office, toothbrush, cup, and, lo and behold, his "new" toothpaste in hand. What was it? Neosporin!
I promptly called my sister, because, being that she is older and wiser, she would know what to do. "Well, have you called Poison Control?" she asked calmly. No, no I had not. She assured me that he was probably fine, but texted me their number to call them anyway. After I got Cole to rinse out his mouth (which, of course, he passionately resisted), I gave them a call. The lady at Poison Control was incredibly sweet and once again, I was assured he would be fine. In fact, an hour or so later she called back just to check in on him!
Needless to say, the lesson for this mom has been learned. If I want to keep my job, I cannot watch my kids every second of the day, but I can make sure the Neosporin isn't within reach of little hands (the top shelf of the medicine cabinet is apparently not enough!). I also have the Poison Control number programmed into my phone now. It's 1-800-222-1222. Add it to your phone if you haven't already. You never know when you'll need to give them a call!
Thursday, December 5, 2013
Sunday, December 1, 2013
Christmas Joy Sign

I made this sign a few years ago-- it's ridiculously easy and cheap! I bought three frames from the Dollar Store, some scrapbook paper, and a little bit of red felt. To make the lettering look neat, print out the font you like and pin it along the letters to the fabric. Cut out the letters by following the printout and then glue the letters to the scrapbook paper. I ended up gluing the frames together, too (I think I used wood glue). It's a seriously cute craft on a seriously small budget (it definitely cost me less than $5)!
I love the word "joy". It's such a little word but it has so much meaning and depth. I hate to be cliche and quote the Dictionary.com definition, but it's too good not to. It says, "the emotion of great delight or happiness caused by something exceptionally good or satisfying."
What's funny about that definition is that the world of consumerism is constantly trying to live up to it, especially during the Christmas season. They want you to believe that their product will bring you joy, that whatever they're trying to sell you will completely satisfy you. Well, to put it bluntly, it won't. Could you imagine if products did indeed satisfy us? Think about it, if we actually received true joy from these products, we would have stopped buying new products long ago. In fact, our society as we know it would cease to exist. We'd all be home joyfully using the very first product we ever received with no intent (or need) in finding a new one to satisfy us.
Does that make sense at all? This might be one of those times where it's completely logical in my head but not so much on the screen.
Anyway, I hope this Christmas season you're able to experience true joy, the kind that is deeply good, satisfying and lasting; the kind that doesn't come in the form of a box, but rather that of a baby born in a manger.
Joy to the world, the Lord has come-- let earth receive her King!

Sunday, November 17, 2013
DIY Burlap & Twine Ornaments
I know we haven't even had Thanksgiving yet, but once it comes we only have 3 1/2 weeks to jam our crafting, cookie-making and decorating in before Christmas arrives (I guess shopping, too, but that's my least favorite thing to do during the holiday season). In my book, that's simply not enough time to do all that I have planned so I decided to start a little bit early this year. Don't judge.
It's no secret that I love everything about burlap. You can probably tell since this is the second craft I've posted on here and both have to do with burlap. I wonder if in 20 years I'll ask myself why I used so much of it-- God willing, we'll find out!
So, I wanted to try out my own version of a burlap ornament and here is what I came up with:

What do you think? I wish my "joy" lettering was a little smaller, but other than that I'm pretty happy with how these turned out.
If you're interested in making some yourself, here's what you need:
*Light (natural) burlap
*Clear ornaments (I used glass)
*Mod Podge
*Twine
*Hot glue
*Sponge paint brush
*Ribbon
*Scissors
*Bells (if desired)
1. Place your ornament on the burlap, folding it over the ornament so the triangle peaks above the top by a few inches. Use this rough estimate to cut the burlap into a square.

2. Coat the ornament with Mod Podge using the sponge paint brush. You can be generous. Moving quickly, wrap the ornament with the burlap so it peaks at the top and the sides of the ornament. Continually smooth the burlap, pinching it tight to the two parts where the burlap comes together.


4. Add more Mod Podge if the burlap is not sticking to the ornament. It can take a few minutes of smoothing and pressing to get it pinched neatly together, but be careful not to leave your fingers in one spot too long (your sticky fingers could pull up the burlap). Once it has dried, cut off the excess burlap. It should look like this:

5. Next you can add a design or word using hot glue and twine. Using thin lines of glue, add the twine to the burlap. If you're creating letters, map it out beforehand (see below).


6. To finish, hot glue the twine as you wrap it around the top.

7. Tie your ribbon to the top. To add a pop of color to each ornament, I used a red ribbon and some red bells.
.JPG)
What I love about this is that the possibilities are endless. You can do letters, swirlies, stripes, etc. You can even swap out the twine for some other kind of material. I also considered covering a red or silver ornament with burlap. Could look cool, right?
Well, happy Christmas crafting, all!
Sunday, November 10, 2013
The "Like" Button
No one likes my husband.
Just kidding. Of course they do. What I mean is, no one "likes" my husband's Facebook statuses, videos or pictures. No one shares his Tweets, "hearts" his pictures on Instagram or comments about his blog. Not because they're not funny or cute or interesting, but because he doesn't post any. (Actually, he doesn't have Instagram or a blog, but you get my point.)
Perhaps you didn't have Facebook when it was first introduced in 2004, but believe it or not, it didn't have the "Like" button available at the time. In fact, it wasn't even introduced until 2010. Isn't that weird? That was just a little less than four years ago! But now, oh man, the "Like" button is everywhere. We couldn't imagine our lives without it.

Don't get me wrong, I LIKE the "Like" button (get it?). I enjoy letting a friend know that I found his or her post cute/hilarious/entertaining. I also appreciate it when others do the same for me. However, I also hate it. It's a dangerous game. Unless you're the most secure person in the world, a "Like" can play with your mind if you let it.
Let me elaborate. Let's say you update your Facebook profile picture and it receives 23 likes. Hooray! Twenty-three people enjoyed your new picture enough to click a button for it. But wait, Sally just updated her profile picture and within two minutes it has 384 likes. What in the world? Isn't your picture just as cute as Sally's? Why did she receive so many more likes than you did?
See what I mean?
If we're not careful, we can put our self-worth in the "Likes" of a virtual world (even if it's just momentary). Isn't that just silly? Most of us are guilty of it, though. (If not then I might find myself in a super awkward and vulnerable position as I'm admitting that I am.) If you let it, the "Like" button can discourage you, cause you to compare yourself to others, and perhaps even worst of all, it can make you prideful.
I'm not requesting the "Like" button be removed from existence. I'm not suggesting we stop posting, sharing, or even liking. All I'm saying is that we need to check ourselves every once in a while. Are we basing our worth on the "Likes" of others? If so, we're walking on dangerous ground. Our self-worth will fluctuate like the wind, and with that leave us dry to the bone.
Maybe this doesn't apply directly to you because, like my husband, you're not really involved with social media, but I'm sure you can relate in some way, shape or form. Ask yourself what you are putting your worth in. If it's not True and Good and Lasting then, to put it simply, it's not worthy of you.
"Like" if you agree.
Bahahaha! Sorry-- I just had to end that way! ;)
Tuesday, November 5, 2013
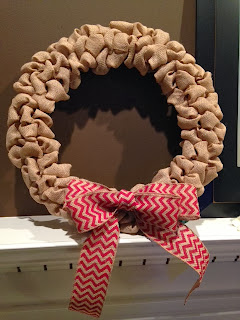
Burlap in Wreath Form
I know I'm a little behind on the burlap wreath front, but I've been eying them on Pinterest for a while now and I finally had a "free" Saturday to attempt one myself (what is free really, when you have kids?).
Here is how it turned out:
Here is how it turned out:

Isn't it pretty? I love how simple and elegant it is.
It was surprisingly easy, although nothing is truly easy for me. I like to make things more difficult for myself. For example, I got the wrong size burlap. Eh, oh well. I like the way it turned out, and I'm actually glad I made that mistake. I'll explain why later.
So, what you need to make this gorgeous wreath:
1-2 rolls of 2 1/2-4 in. wide WIRED burlap ribbon (I used a little less than 2 30 ft. rolls of 2 in. wide WIRED burlap)
1 wire wreath frame (pick your size- I did 16 in.)
Any bows you want to add!
***If you don't use a wired burlap ribbon, you might want to check out this blog about using floral wire to secure it-- I didn't have to do that because I used the wired ribbon. :) Also, I found mine at Hobby Lobby... I'm not sure which craft stores have this type of burlap ribbon.***
***If you don't use a wired burlap ribbon, you might want to check out this blog about using floral wire to secure it-- I didn't have to do that because I used the wired ribbon. :) Also, I found mine at Hobby Lobby... I'm not sure which craft stores have this type of burlap ribbon.***
Step 1:
Insert the burlap into the top rung. String in and out through the next two rungs, and bring it out the bottom. (FYI: Your burlap stays on the roll the whole time. This confused me for quite some time, but you'll get the hang of it pretty quickly.)
 | ||
Step 2: From the top rung, pull up a couple inches of fabric (or whatever looks good to you). Twist it to secure it underneath. Then pull up more fabric through the next rung. Squish and mold as you go.
 |
| (This is what it looks like underneath.) |
Step 3: Continue this pattern. Pull up fabric, twist underneath, then pull up more fabric in the next rung. After you get to the bottom rung, start back up at the top.


Eventually you'll start noticing these pretty burlap bubbles. The benefit of the rolls of burlap I used was that they were wired. I could mold and shape the burlap how I liked it. Also, while all burlap wreaths are pretty, I prefer the tighter/cleaner burlap wreaths over the big/loose ones. Using the 2-inch wide burlap helped achieve this look.
Here is what the back of my wreath looks like. I ran out of burlap about 2/3rds of the way through (SO frustrating!).
Here is what the back of my wreath looks like. I ran out of burlap about 2/3rds of the way through (SO frustrating!).

The cool part about this wreath is that you do not have to hot glue anything-- not even the bows! I simply used a safety pin to secure my bow onto my wreath. I've seen others suggest using wires. I plan to change my bows out every season (or when I remember).
Lastly, you may have noticed the picture with lights on my wreath. That's an experiment, really, but I do kind of like it. I bought battery-powered LED lights (THEY MUST BE LED-- ANY OTHER KIND COULD START A FIRE! LED lights do not get hot!). I didn't like how bright and clear they were, so I taped each light with a piece of masking tape to tone it down a little. Then I simply stuck the lights in the burlap, securing it under the wire rim of the frame every so often.
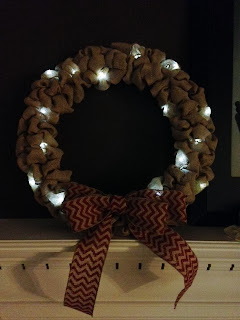

Lastly, you may have noticed the picture with lights on my wreath. That's an experiment, really, but I do kind of like it. I bought battery-powered LED lights (THEY MUST BE LED-- ANY OTHER KIND COULD START A FIRE! LED lights do not get hot!). I didn't like how bright and clear they were, so I taped each light with a piece of masking tape to tone it down a little. Then I simply stuck the lights in the burlap, securing it under the wire rim of the frame every so often.

Something fun and different, I suppose. :)
Burlap wreaths are totally doable. I got the hang of it after the first few minutes, and if I can do it, you can, too!
Burlap wreaths are totally doable. I got the hang of it after the first few minutes, and if I can do it, you can, too!
Wednesday, October 16, 2013
The Pinterest Process
I don't know about you, but I am often overwhelmed by the gloriousness that is Pinterest. Why are people so much smarter than I am? I mean honestly, people are geniuses. They come up with the coolest ideas, crafts and recipes. I am not one of those people. However, I do attempt Pinterest crafts and/or recipes every once in awhile, and I have decided that I go through what I like to call the Pinterest Process.
It goes a little something like this:
It goes a little something like this:
1. {Upon discovering a new pin} I have to make that immediately!
I have no idea how I have been living without that for the past
(insert age) years. My life will be forever changed as a result of making this pin.
2.
I know that I need to go to the grocery store because we haven't had
milk in three days, but I MUST go to Hobby Lobby to buy all the supplies
for this craft. Priorities, people!
3.
I am still super excited about this craft; however, after wandering aimlessly around Hobby Lobby for several hours, I need to rest. I
will definitely start on it tomorrow. In the meantime, I will lay all
of the supplies out on the kitchen table for easy access.
4.
{3 months later} Okay, for real now. I am starting on my Pinterest
craft today! I just need to get on Pinterest again to find the pin...
5. {83 new pins and 3 days later} Today is the day! This is going to be great. So it looks like I need to put a little glue here, paint a little there, and VOILA!
6. There is no way that person actually made that craft.
Of course there are always variations of the Pinterest Process. If you are actually successful in making the craft (or recipe), I'm assuming some type of picture of the project will end up on Facebook, Twitter, a blog, or Instagram. Am I right?
Or perhaps you never even finish making the craft. Last year around this time, I spent countless hours tracing and cutting out leaves from a book to make a gorgeous fall wreath. By the time I was done, I was so burnout on the project that the leaves are still sitting in a box in my basement. Apparently I need to work on following through on these things.
The worst, though, are recipe fails. We've had to order quite a few pizzas over the past few years after I've attempted a new recipe. Either I have a strong inability to follow directions, or people seriously exaggerate how the recipe for pork chops is "THE BEST EVERRRR!"
Anyway, my point is, very rarely do I achieve the beauty seen in the original pin. I hope I'm not the only one out there. I know my fabulous sister-in-law has felt my pain at one point. Here is a picture she took of a recipe fail (that still tasted DELICIOUS):

Gotta love it.
Happy pinning!
Of course there are always variations of the Pinterest Process. If you are actually successful in making the craft (or recipe), I'm assuming some type of picture of the project will end up on Facebook, Twitter, a blog, or Instagram. Am I right?
Or perhaps you never even finish making the craft. Last year around this time, I spent countless hours tracing and cutting out leaves from a book to make a gorgeous fall wreath. By the time I was done, I was so burnout on the project that the leaves are still sitting in a box in my basement. Apparently I need to work on following through on these things.
The worst, though, are recipe fails. We've had to order quite a few pizzas over the past few years after I've attempted a new recipe. Either I have a strong inability to follow directions, or people seriously exaggerate how the recipe for pork chops is "THE BEST EVERRRR!"
Anyway, my point is, very rarely do I achieve the beauty seen in the original pin. I hope I'm not the only one out there. I know my fabulous sister-in-law has felt my pain at one point. Here is a picture she took of a recipe fail (that still tasted DELICIOUS):
Gotta love it.
Happy pinning!
Sunday, September 29, 2013
Thankful for Spilled Milk
About a month ago, during the hottest week of the summer, I was on the way home from the grocery store when disaster struck. Cole, my 3-year-old, was screaming bloody murder because we only went to one grocery store, not two like we usually do. It was the kind of scream that makes you wish you had an automatic shut-off button for your ears. Distracted, I went over the hill of some railroad tracks a little too fast. And by a little, I mean way too fast. We were honestly weightless for a brief second. But, as you know, we have this thing on Earth called "gravity", and that sucker brought my van, groceries and all, crashing back on land.
When I got home and began unloading the trunk, I discovered the repercussion of my mistake. An ENTIRE gallon of milk cracked right down the middle and spilled everywhere. I mean every. last. drop.
After attempting to use two milk cleaning strategies suggested by the Internet, baking soda and vinegar (which, by the way, made our van smell like pickled sour milk and I'm pretty sure it did nothing but make the smell worse), we decided to let our van "air out" by leaving all the windows and doors open. Sounds like a good idea, right? WRONG!
Turns out flies like the smell of spoiled milk and vinegar. They really like it. It makes a nice little home for future flies, if you know what I mean. That's as much detail as I can give on that because 1) I don't want to dredge up the horrific images I have tucked neatly away in my brain and 2) you might never read this blog again.
As I complained to my sister about this travesty that had befallen us, she gently suggested that I be thankful. Thankful no one was injured. Thankful I didn't pop any tires. Thankful the axle of our van wasn't destroyed. And she was right. While this "catastrophe" stressed me out beyond belief, I am thankful it was just some spilled milk. It was also a good reminder to keep my cool, even when my child is damaging my eardrums.
In the end we did get the smell out of our van. The thing that worked? A Bissell ProHeat 2x! Our neighbors were kind enough to lend us theirs for a week, and I now have a new item on my wishlist. But most of all I am thankful for the reminder of what is important and how blessed I really am.
Wednesday, September 25, 2013
Mommy Guilt
If you're a mom, I'm certain you've felt it.
It creeps up on you when you're reading a blog, talking to other parents, or when you can't spend as much time with your kids as you want.
It makes you feel inadequate, incapable, insufficient.
It's called "Mommy Guilt".
And who needs it? Not this mom.
Last night, as I was feeding my 2-month-old daughter at 3:30 in the morning, I stumbled across an article about "bad" parenting practices. It used phrases like "hinder brain development", "epidemic of anxiety and depression", and several other fear-striking words.
At first I felt sick about it. I did almost all of the things that the article said not to do. (I'm purposely not sharing what those are because I don't want you to feel the same guilt I did.) Then I moved to anger. Who are you to tell me how to parent my unique children?
But right now I am over the guilt. I am over the anger. Right now I want to encourage other mommies who have felt the same way as I have.
I talked to my own mom about this guilt we feel as parents. "You will never feel like you have done it right, like you did enough for your children," she said. Now you might think that downright freaked me out. And maybe it did at first, but the more I thought about it, the more it gave me hope. Do you want to know why?
Because I feel my mom did it right, that she did enough. And she still does.
There is no "right way" to parent. There are no perfect parents either. Don't let "Mommy Guilt" keep you from enjoying the blessing of being a mom to the beautiful children God has given you. :)
~Sarah~
Subscribe to:
Posts (Atom)