Sunday, November 17, 2013

DIY Burlap & Twine Ornaments

I know we haven't even had Thanksgiving yet, but once it comes we only have 3 1/2 weeks to jam our crafting, cookie-making and decorating in before Christmas arrives (I guess shopping, too, but that's my least favorite thing to do during the holiday season).  In my book, that's simply not enough time to do all that I have planned so I decided to start a little bit early this year.  Don't judge.

It's no secret that I love everything about burlap.  You can probably tell since this is the second craft I've posted on here and both have to do with burlap.  I wonder if in 20 years I'll ask myself why I used so much of it-- God willing, we'll find out!

So, I wanted to try out my own version of a burlap ornament and here is what I came up with:


What do you think?  I wish my "joy" lettering was a little smaller, but other than that I'm pretty happy with how these turned out.

If you're interested in making some yourself, here's what you need:

*Light (natural) burlap
*Clear ornaments (I used glass)
*Mod Podge 
*Twine
*Hot glue
*Sponge paint brush
*Ribbon
*Scissors
*Bells (if desired)


1.  Place your ornament on the burlap, folding it over the ornament so the triangle peaks above the top by a few inches.  Use this rough estimate to cut the burlap into a square.


2.  Coat the ornament with Mod Podge using the sponge paint brush.  You can be generous.  Moving quickly, wrap the ornament with the burlap so it peaks at the top and the sides of the ornament.  Continually smooth the burlap, pinching it tight to the two parts where the burlap comes together.


4.  Add more Mod Podge if the burlap is not sticking to the ornament.  It can take a few minutes of smoothing and pressing to get it pinched neatly together, but be careful not to leave your fingers in one spot too long (your sticky fingers could pull up the burlap).  Once it has dried, cut off the excess burlap.  It should look like this:


5.  Next you can add a design or word using hot glue and twine.  Using thin lines of glue, add the twine to the burlap.  If you're creating letters, map it out beforehand (see below).


6.  To finish, hot glue the twine as you wrap it around the top. 


7.  Tie your ribbon to the top.  To add a pop of color to each ornament, I used a red ribbon and some red bells.


What I love about this is that the possibilities are endless.  You can do letters, swirlies, stripes, etc.  You can even swap out the twine for some other kind of material.  I also considered covering a red or silver ornament with burlap.  Could look cool, right?

Well, happy Christmas crafting, all!

Sunday, November 10, 2013

The "Like" Button

No one likes my husband.

Just kidding.  Of course they do.  What I mean is, no one "likes" my husband's Facebook statuses, videos or pictures.  No one shares his Tweets, "hearts" his pictures on Instagram or comments about his blog.  Not because they're not funny or cute or interesting, but because he doesn't post any.  (Actually, he doesn't have Instagram or a blog, but you get my point.)

Perhaps you didn't have Facebook when it was first introduced in 2004, but believe it or not, it didn't have the "Like" button available at the time.  In fact, it wasn't even introduced until 2010.  Isn't that weird?  That was just a little less than four years ago!  But now, oh man, the "Like" button is everywhere.  We couldn't imagine our lives without it.


Don't get me wrong, I LIKE the "Like" button (get it?).  I enjoy letting a friend know that I found his or her post cute/hilarious/entertaining.  I also appreciate it when others do the same for me.  However, I also hate it.  It's a dangerous game.  Unless you're the most secure person in the world, a "Like" can play with your mind if you let it.

Let me elaborate.  Let's say you update your Facebook profile picture and it receives 23 likes.  Hooray!  Twenty-three people enjoyed your new picture enough to click a button for it.  But wait, Sally just updated her profile picture and within two minutes it has 384 likes.  What in the world?  Isn't your picture just as cute as Sally's?  Why did she receive so many more likes than you did?

See what I mean? 

If we're not careful, we can put our self-worth in the "Likes" of a virtual world (even if it's just momentary).  Isn't that just silly?  Most of us are guilty of it, though.  (If not then I might find myself in a super awkward and vulnerable position as I'm admitting that I am.)  If you let it, the "Like" button can discourage you, cause you to compare yourself to others, and perhaps even worst of all, it can make you prideful.

I'm not requesting the "Like" button be removed from existence.  I'm not suggesting we stop posting, sharing, or even liking.  All I'm saying is that we need to check ourselves every once in a while.  Are we basing our worth on the "Likes" of others?  If so, we're walking on dangerous ground.  Our self-worth will fluctuate like the wind, and with that leave us dry to the bone.

Maybe this doesn't apply directly to you because, like my husband, you're not really involved with social media, but I'm sure you can relate in some way, shape or form.  Ask yourself what you are putting your worth in.  If it's not True and Good and Lasting then, to put it simply, it's not worthy of you.

"Like" if you agree.

Bahahaha!  Sorry-- I just had to end that way!  ;)


Tuesday, November 5, 2013

Burlap in Wreath Form

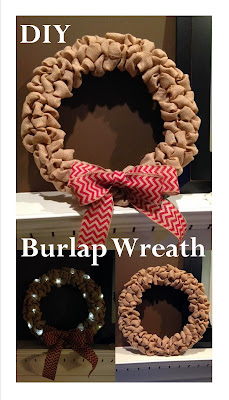
I know I'm a little behind on the burlap wreath front, but I've been eying them on Pinterest for a while now and I finally had a "free" Saturday to attempt one myself (what is free really, when you have kids?).
Here is how it turned out:
Isn't it pretty?  I love how simple and elegant it is.

It was surprisingly easy, although nothing is truly easy for me.  I like to make things more difficult for myself.  For example, I got the wrong size burlap.  Eh, oh well.  I like the way it turned out, and I'm actually glad I made that mistake.  I'll explain why later.

So, what you need to make this gorgeous wreath:

1-2 rolls of 2 1/2-4 in. wide WIRED burlap ribbon (I used a little less than 2 30 ft. rolls of 2 in. wide WIRED burlap)
1 wire wreath frame (pick your size- I did 16 in.)
Any bows you want to add!

***If you don't use a wired burlap ribbon, you might want to check out this blog about using floral wire to secure it-- I didn't have to do that because I used the wired ribbon. :)  Also, I found mine at Hobby Lobby... I'm not sure which craft stores have this type of burlap ribbon.***

Step 1:
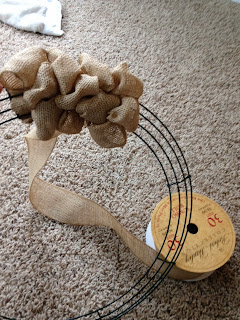
Insert the burlap into the top rung.  String in and out through the next two rungs, and bring it out the bottom.  (FYI:  Your burlap stays on the roll the whole time.  This confused me for quite some time, but you'll get the hang of it pretty quickly.)


 Step 2:  From the top rung, pull up a couple inches of fabric (or whatever looks good to you).  Twist it to secure it underneath.  Then pull up more fabric through the next rung.  Squish and mold as you go.

(This is what it looks like underneath.)

Step 3: Continue this pattern.  Pull up fabric, twist underneath, then pull up more fabric in the next rung.  After you get to the bottom rung, start back up at the top.


Eventually you'll start noticing these pretty burlap bubbles.  The benefit of the rolls of burlap I used was that they were wired.  I could mold and shape the burlap how I liked it.  Also, while all burlap wreaths are pretty, I prefer the tighter/cleaner burlap wreaths over the big/loose ones.  Using the 2-inch wide burlap helped achieve this look.

Here is what the back of my wreath looks like.  I ran out of burlap about 2/3rds of the way through (SO frustrating!).


The cool part about this wreath is that you do not have to hot glue anything-- not even the bows!  I simply used a safety pin to secure my bow onto my wreath.  I've seen others suggest using wires.  I plan to change my bows out every season (or when I remember).


Lastly, you may have noticed the picture with lights on my wreath.  That's an experiment, really, but I do kind of like it.  I bought battery-powered LED lights (THEY MUST BE LED-- ANY OTHER KIND COULD START A FIRE!  LED lights do not get hot!).  I didn't like how bright and clear they were, so I taped each light with a piece of masking tape to tone it down a little.  Then I simply stuck the lights in the burlap, securing it under the wire rim of the frame every so often.


Something fun and different, I suppose.  :)

Burlap wreaths are totally doable.  I got the hang of it after the first few minutes, and if I can do it, you can, too!